Tuesday, 27 December 2016

6 Frustrations Every Travel Photographer Experiences On Location


Every travel photographer will tell you that this very rewarding profession comes with a lot of frustrations as well. The countless hours spent walking around, all the early morning alarm clocks and the constant battle with the elements are, for the most part, worth the effort. But occasionally travel photography can be incredibly frustrating. Here are six frustrations that every travel photographer experiences on location at some point in their career.


travel photographer frustrations


#1 Bad weather

Ask most travel photographers and bad weather would usually be at the top of their list of frustrations. There is nothing more demoralizing than being at a location and having the weather hinder your plans. Of course, you can minimize the impact of adverse weather by doing your research beforehand and ensuring that you head to your chosen destination at a time when you will get your ideal weather, but even the best plans can be ruined.

Often the choice you have is to either go ahead with your shoot anyway after all bad weather can sometimes add a different dimension to a familiar destination, or you need to have a backup plan. For example, if you are experiencing bad weather when photographing landscapes, you can head into forests and jungles where the flat light will make things easier to photograph. Or in a city, you could look to photograph indoors at museums and galleries (if allowed). The key to avoiding the frustration ruining your photo shoot is to be prepared.


#2 Construction work in your scene

You have just arrived at a dream UNESCO World Heritage site and are excited about the next few days and photographing one of the most iconic places in the world. But as you walk up to it, you are suddenly confronted with scaffolding and building work right in the middle of your scene. As you might have gathered I’m talking from personal experience when I visited Angkor Wat a few years ago.

Unfortunately, sometimes there is no getting around it. You simply have to figure out how you can still capture great photos while also being able to exclude the unwanted scaffolding in your scene. Often, it’s not a lost cause and if you walk around and look for different angles you may be able to crop the building works out. Using natural elements such as trees is also a good way to block these out and sometimes you can remove elements in post-production. But ultimately sometimes you simply won’t be able to capture the shot you want and will have to try to find other elements that can still give you a good collection of photos.

But ultimately sometimes you simply won’t be able to capture the shot you want and will have to try to find other elements that can still give you a good collection of photos.

#3 Closures of venues or buildings

There are times as a travel photographer that you feel fate has conspired against you. For all the research and planning that can go into preparing for a shoot, sometimes events happen which are out of your control. Unexpected closures of venues or buildings that were on your shot list can be incredibly frustrating and stressful, especially if you are on an assignment. There are times where there is nothing you can do. You just have to accept that the situation is beyond your control.

The only thing that could help in these situations is more time at the destination. An extra day might mean the venue re-opens after the power cut so it’s always a good idea to build in a bit of extra time into your trip (if you can) to allow for these sorts of situations.

#4 Tourists


Tourists do have a tendency of wandering into people’s photos unknowingly, usually because they are not paying attention. Travel photographers have to either find ways to exclude people from their photos or simply try to include them. More and more picture editors are now looking for images that convey an experience rather than just a “touristy” photo, so including people in your photos can actually benefit the composition. But sometimes you will need to exclude people and that is where you need to be creative and patient.

At busy tourist destinations the crowds often arrive in waves and if you wait long enough you will find a gap in the flow of people. If the venue is outside, photographing early morning will usually mean you have the place to yourself for a few hours.

#5 Traffic

One of the major hindrances to destination photography is not allowing enough time to photograph everything you have on your shot list. Most people make the mistake of underestimating the time it takes to get around and also the time it takes to photograph one scene.

Traffic is one of the key factors that you should consider when photographing any big city. Even though it may only be a few kilometres to drive from A to B, it might take longer than the time you allocated. So, to avoid rushing, make sure you allow yourself an extra few hours. You can always spend the extra time photographing if you arrive early.

#6 The “nearly shots”


Most photographers have, at some point in their photography journey, suffered from this syndrom. Whether you are a professional or amateur there are those moments when you just think, “What if?”

You have everything in place and have framed your shot perfectly. You have great light and an interesting subject and all that is needed to complete the image is a person to be standing in the foreground. But they never materialize and you end up with one of those “nearly shots”.

Often one of the biggest differences between professional photographers and amateurs is the ability to persevere in this sort of situation and wait, or keep coming back until you get the shot. But sometimes it doesn’t happen even for the pros and you just have to accept that “nearly shot” because time has run out and you have to move on.

Conclusion


Travel photography can sometimes be the most frustrating branch of photography to do. But even with all of the above frustrations most travel photographers will say that they would never want to do anything else. With practice, perseverance, and good planning, often you can avoid these scenarios. But sometimes you just have to accept that the shot you wanted wasn’t meant to be on that occasion and move on.
Sunday, 18 December 2016

5 Creative Uses for the Super Versatile 50mm Lens


When I am out and about with my family, say on a trip or a holiday, I go really thin on the gear and use this to challenge myself to think of new and creative ways to use just one camera and one lens. I usually carry an 85mm as my choice of lens, but I have been using the 50mm lately for this purpose. The 50mm lens is a hugely versatile one that is a handy size for traveling too.


Having a totally pared down kit has its advantages. It pushes you to think outside the box and to find new ways of making pictures without having much choice of gadgets at all. The limitations you put on yourself certainly makes you more creative. It also makes you give extra careful consideration to factors that make a good image such as lighting, composition, color, the subject, and action.

To further challenge myself, which I do on nearly every family break, I don’t actively go out seeking subjects to photograph. My aim during my vacation with family is not to carve out time away from them in order to shoot some images. Rather, I actually give in to the limitations of the holiday and shoot what is in front of me, what happens as part and parcel of the trip or vacation. It increases the restrictions of course and takes away the usual amount of control I have when staging a photo shoot, but I believe it helps me practice using my eye and keeps me sharp. Personal photographs are the hardest to do, so with everything thrown in the box, this is definitely a creative challenge. Don’t let the lack of sophisticated gear cramp your style.

Here are five creative ways to use the 50mm if you find yourself in a similar situation (traveling with non-photographers) or want to set yourself a similar challenge.

#1 – Close-up shots

We are not talking macro close-up here of course but you can get pretty close for a normal lens. The lens’ ability to open to f/1.4 (or f/1.8 if you have that version) can give you a very shallow depth of field, so the contrast between is the subject in focus and the background can be quite dramatic. I usually use manual focus if the lens struggles to focus automatically because I am too close. You can definitely leverage the 5omm’s wide aperture to exaggerate the contrast between your sharply focused subject and the shallow depth of field.

You can also use your 50mm as a macro lens using the reverse lens macro technique by purchasing an inexpensive reverse mounting ring.


#2 – Silhouettes


I used to be rather panicked when shooting silhouettes on the fly. When I wasn’t trying to shoot a silhouette and suddenly I saw the potential for a great one, I would get brain freeze. What settings are appropriate? What shall I adjust? ISO? Aperture? Shutter speed? Shall I go semi-manual, fully automatic or stay fully manual mode shooting (which I am on most of the time anyway)?

With silhouettes, you must meter the brightest part of the background in order to underexpose the subject. The easiest way to create a silhouette is to shoot in manual mode. When you meter the background using either the back button or the by pressing the shutter button halfway down, this also means that you are focusing on that spot and not on your subject. Therefore your subject would not be as crisply outlined as you would like it to be. Your focus needs to be the subject and thus it needs to be sharp and clearly defined. After metering the background, you must move your focus to the subject but not change your exposure settings. Take the image and see what it looks like, and adjust the exposure as necessary. It’s as simple as that.
Lock the exposure

Now if you are shooting in automatic mode or semi-automatic which gives the camera full or partial control of the settings, you will find yourself in a pickle when shooting silhouettes. The moment you move your focus to the subject and press the button halfway down to focus, your camera will also adjust the exposure settings based on the light hitting the subject. You then lose your background settings which are the basis for your silhouette image. You can also use Exposure Lock (AEL) to set the exposure.

Read more about how to shoot a great silhouette in this article: How to Photograph Silhouettes in 8 Easy Steps


#3 – Portraits


On a trip such as a family vacation, I aim to capture natural moments and not necessarily strive to take the best portraits of my kids, posed or otherwise. I try and keep my eyes peeled for good light and opportunities but I hate to stop the natural flow and moments of the day just so I can take great portraits. With my own children, I try to be grateful for any I get, to be perfectly honest.

The 50mm is a superb lens for candid photography, street shots, and portraits. It gives me enough wiggle room (on my full frame camera) for the scene I want to capture. I don’t have to worry about moving further back if I want to capture more of a wider scene like I usually do with the 85mm , or going closer as I do with my 35mm and with it the risks of distortion for portraits if I get too close. The 50mm is comfortable and convenient for travel portraits and is a great handy size too, not taking up a lot of space in my handbag.


#4 – Night photography


For night shots including light painting and dragging the shutter, the 50mm lens is brilliant. The fun ghostlike painting images below were taken with a fairly slow shutter speed, as low as I can go hand-held, to make sure some ambient light in the sky was captured. I had the kids hold their torches (flashlights) underneath their faces which also illuminated the tippee behind them, with the triangular structure adding a more dynamic feel to the image.


This photo below was done with a technique called dragging the shutter. I set my shutter speed so low, around 1/10th of a second, and took the image with my camera’s pop-up flash pointing straight at my son. As the image was taken, I also moved the camera up and down as fast as I cold within the 1/10th of a second. The flash froze my son so that he is sharp and clear, while my exaggerated movement of the camera blurred the background and added motion to the ambient light during the time the shutter was open. You must try this, it’s great fun! It is possible as long as you have a flash, whether that be a pop-up, on-camera or off-camera flash.


This light painting image below was taken with the Bulb setting. For this to happen without a tripod, I had to put my camera down on a steady surface and positioned my kids in front of me where I could get enough of the scene in the shot.

#5 – Travel and picture-scapes


This is one of the reasons why I love the 50mm lens. It is fantastic as a handy travel lens and creates very pleasing views. I find it so adaptable to a myriad of scenes and it’s incredibly versatile, not only for its focal length but also for its aperture range.

To be able to shoot at f/1.4 (or f/1.8) is amazing and the icing on the cake. The price is minimal. Super versatile and easy on the pocketbook, it’s a magic lens and I would recommend all serious enthusiasts to get one.


Friday, 16 December 2016

Five Fun Ideas for Making Festive Holiday Images

November in the Northern Hemisphere can be a bleak time of year for photographers. Daylight hours are short, temperatures drop and the leaves have fallen off the trees. Luckily, in December, cities and suburbs decorate with a blaze of holiday lights and color. Even if it’s not your usual thing, gather up a few friends for a fun photo walk to create some beautiful and colorful holiday images.

Bring a tripod or don’t – you can make do as you go along. Your goal is to have fun and to make images that capture the essence of the season. Embrace the colors, look for holiday lights, keep an eye out for seasonal blooms, capture miniature moments, and photograph the music around you. Read on for tips and ideas for making beautiful holiday images.

1. Embrace colors


Over-the-top holiday decorating is filled with color. Department stores like Macy’s use festive decorating as a way to lure customers into the store. It’s a lure for photographers too. Just look at this red lighting in Macy’s!


Believe, The Walnut Room at Macy’s in Chicago, IL
Canon 5DIII, Canon 24-105L @ 24mm, ISO 3200, 1/90th, f/4, hand-held


Inside a department store, the ambient light will be low and you probably won’t be allowed to use a tripod. The solution is to crank up your ISO. You’ll want your shutter speed as fast as possible to prevent motion blur. If you have a steady hand or if your lens has stabilization, you’ll be able to hand-hold at lower shower speeds but a high ISO – think 2000 to 4000 – should give your shutter speed the boost it needs.
Composing your images

In addition to the riot of holiday color, department stores are filled with signage, bright spotlights, and people so be creative when you compose your images. Try unusual perspectives to help you avoid distracting elements. Here at the Walnut Room in Macy’s Chicago you can photograph the tree from the ground floor, from the elevator, and from the upper gallery. The first image above was shot from a low vantage point. The result emphasizes the angled red ceiling and the word “Believe.” The second image looks down, emphasizing the size of the tree.


The great tree, The Walnut Room at Macy’s in Chicago, IL
Canon 5DIII, Canon 24-105L @ 24mm, ISO 3200, 1/30th, f/6.7, hand-held


Sometimes it helps to zoom in when you compose. Don’t worry about fitting the entire tree into your frame. Instead, move around and find a composition with repeating elements, like the smaller tree projected on the wall.
Pink Christmas, the streets of London, England
Canon 70D, Canon 18-55 @ 36mm, ISO 200, 1/13th, f/5.6, hand-held


If you don’t have an iconic location like Macy’s Walnut Room near you, head to your local shopping mall or main street shopping district. Shop owners work hard to make their storefronts look beautiful. Again, think outside the box when you compose your images. The trees in the image above caught my eye because they were pink and purple, rather than the traditional red and green. These two trees flanked an open shop door. Since the inside of the shop wasn’t very attractive, the solution was to stand to the side, get low, and focus on the sparkly pink snowflake. The tree on the opposite side of the door then fades into a lovely blur of bokeh.

2. Look for lights


Cities are great places for holiday photo walks and image making. Make sure to check out large parks and plazas that usually have lighted trees. Super large outdoor trees make great focal points. They also make great backdrops when using larger apertures because the twinkly lights blur into a beautiful bokeh.

When shooting in the city, arrive just before dusk to scout your location and find good backgrounds. A beautiful time of day to shoot the holiday lights is the hour after sunset because the sky is a lovely shade of blue. Plus, it’s still bright enough to capture images of people. You might want to use a tripod at this point or, once again, crank your ISO.

This image was supposed to be of the skaters on the rink below the promenade. But this couple looked so beautiful bathed in golden light, I couldn’t help making a picture of them.
Couple enjoying the holiday lights at Millennium Park, Chicago, IL 
Canon 5DIII, Canon 24-105L @ 80mm, ISO 2500, 1/20th, f/4, hand-held


A really fun photograph is to focus on a lighted tree branch, especially if the bulbs are unusual, like these that are faceted and made to look like cut glass crystal. To make this image, find an isolated tree branch with a clean background. Open your aperture all the way up, preferably to f/1.8 or f/1.4. The wide aperture creates a very shallow depth of field. The bulbs further away will dissolve into soft, round circles.
Bokeh with bulbs, somewhere in suburbia 
Canon 70D, Canon 50mm 1.8 prime lens, ISO 1250, 1/1000th, f/1.8, hand-held


Go monochrome

Scenes filled with white twinkly holiday lights are the perfect time to think about monochrome images too. For images like these, the trick is to underexpose by 1-2 stops. After you take your first shot, check your histogram. It should like sort of like this example, stacked up on the left and just reaching the right hand side, but not climbing up it. Those white twinkly lights are bright and if you expose too far to the right, they’ll look blown out in your final image, with no detail.
Histogram to the left.

By underexposing and keeping your histogram stacked to the left, you do actually lose detail in the shadows. Often that’s a concern, but since the goal for this image is to capture the twinkly lights, the priority is to maintain detail there.
Lucca Basilica di San Frediano, Lucca, Tuscany, Italy
Canon 70D, Canon 18-55 @ 27mm, ISO 2000, 1/1000th, f/4, hand-held


If you’re going for symmetry and crisp geometry, setting your camera on a tripod is the best bet. If you’re trying your hand at street photography, like in the image with the Basilica, try hand-holding but definitely crank up your ISO.
Holiday Symmetry, The East Courtyard, Regenstein Center, Chicago Botanic Garden, Glencoe, IL
Canon 5DIII, Canon 24-105L @ 40mm, ISO 200, 1 second, f/11, tripod


3. Holiday blooms


For macro photographers, the holidays have an exciting assortment of flowers that are forced to bloom during this special season. Experiment with these large blooms by choosing a small aperture and a larger depth of field, like in these two images below. It would also be a blast to use a Lensbaby to make dreamy selective focus images.


Overlapping Red Pearl Amaryllis blooms, Semitropical Greenhouse, Regenstein Center, Chicago Botanic Garden, Glencoe, IL
Canon 5DIII, Canon 24-105L @ 105mm with Canon 500D Close Up Lens (diopter/filter) attached, ISO 400, 1/10th, f/22, tripod

Your best bet for locating these sorts of blooms is a local conservatory or the greenhouses at your local botanic garden. If you have a green thumb, you can even grow them yourself.
Pink Surprise Amaryllis, Semitropical Greenhouse, Regenstein Center, Chicago Botanic Garden, Glencoe, IL
Canon 5DIII, Canon 24-105L @ 105mm with Canon 500D Close Up Lens (diopter/filter) attached, ISO 400, 1/10th, f/22, tripod

4. Miniature moments

Miniature Norman-Rockwell-like villages crop up everywhere at the holidays. For some, they are family heirlooms and setting them up each year is an important holiday rite. If you have a friend who sets up one of these treasured villages every December, invite yourself over for cocoa and offer to photograph it for her.

You can also find exquisite miniature scenes in public places, like the Winter Wonderland Express at the Chicago Botanic Garden.
Winter Wonderland Express 2015, Regenstein Center, Chicago Botanic Garden, Glencoe, IL Canon 5DIII, Canon 24-105 @ 70mm, ISO 2000, 1/45th, f/4, hand-held

The key to successfully photographing miniature scenes is to shoot from eye level with a specific focal point, like the train in the above image. This viewpoint successfully shows the painstaking details of the scene. If you stand up and over a miniature scene, be careful with your composition so that you have a focal point in the scene.

Christmas Reflections, my parent’s lovely home, somewhere in suburbia, IL
Canon 5DIII, Canon 24-105 @ 70mm, ISO 200, 2 seconds, f/16, camera supported by table

Another fun option, if you don’t have a miniature scene available to you, is to create one using props. In the image above, the crystal orb reflects a miniature version of the holiday tree in the distance behind it.

To create this image, move the orb around, setting it on tables and shelves to see what it reflects. Once you find a great reflected scene, set your camera on the same level as the orb. Focus on the scene in the orb and let the background blur away. I found that f/16 gave me the crispest details in the orb but you can experiment and try f/4 or f/8 too. Since you’ll probably be inside with a long shutter speed – this one was 2 seconds – a tripod or firm support method is recommended to prevent motion blur from shaky hands.

Read also: 7 Tips for Doing Crystal Ball Refraction Photography

5. Photograph music

Buskers and musicians abound during the holidays and hopefully you’ll be lucky enough to see a few of them on your holiday photo walk. You can make street photography style portraits of musicians, with the intent to convert to black and white.

In this first image, the background was more cluttered than I would have like but the harpist’s face was so angelic as she sang that I had to capture the moment. If you’re planning to shoot like this, you’ll probably be able to better fly under the radar hand holding your camera. But again – yep, you guessed it – you’ll need to keep your ISO high to prevent the motion blur caused by a low shutter speed. A wider aperture will help too. This is also the perfect opportunity to try a 50mm prime and experiment with wide apertures (f/1.8, f/2, f/2.8).
Holiday Harpist, the streets of Lucca, Tuscany, Italy
Canon 70D, Canon 18-55 @ 55mm, ISO 2000, 1/5th, f/5.6, hand-held

Another option is to embrace the motion blur and make it work for you. Think of it as seeing the music. The shot below is intentionally blurry to show the energy and enthusiasm of the brass band that was playing in the streets of Lucca.

To make your image look like this, focus on a key element like you normally would but intentionally set a slow shutter speed. Try 1/5th or 1/10th of a second first, evaluate the level of blur and then try again, adjusting your shutter speed as needed to get the right look. There is no right or wrong here so just keep experimenting till you get the look that pleases you.

Here the focus was on the girl’s face. I chose her face because I liked the triangle she made with the two musicians around her.
Blurry Brass Band, the streets of Lucca, Tuscany, Italy
Canon 70D, Canon 18-55 @ 53mm, ISO 2000, 1/5th, f/5.6, hand-held


Conclusion
These five ideas are just a few of the many ways you can take advantage of the holidays to make fun and beautiful images. Don’t forget to dress warm, stop often for hot cocoa, and try out a few of these ideas during your photo walk.

Thursday, 15 December 2016

Mantis


Mantis

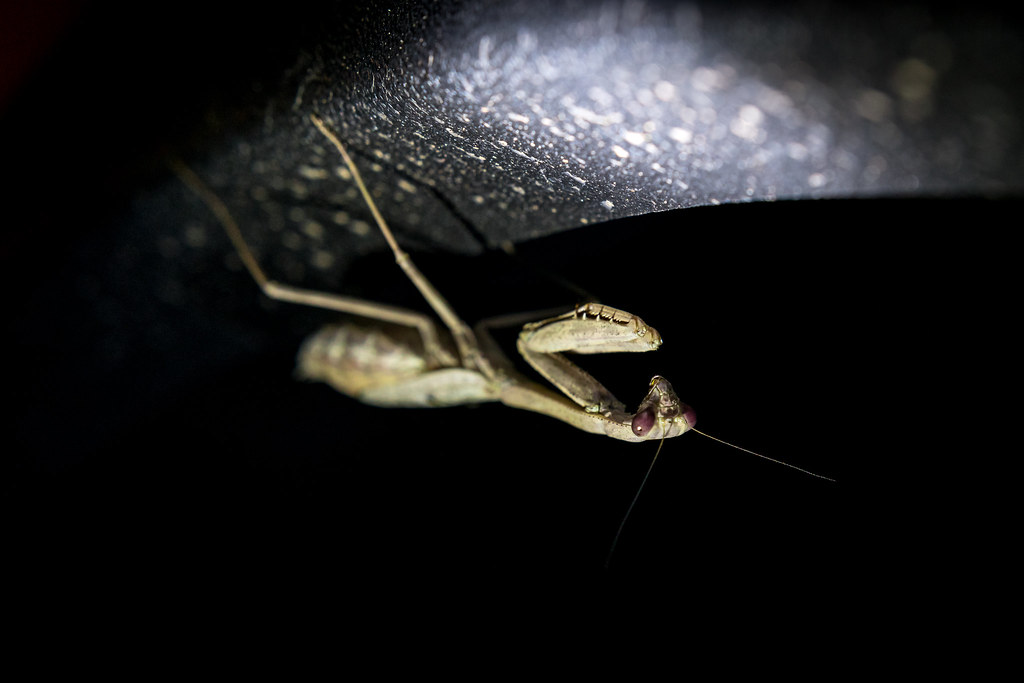
One night in September after the kids went to bed my wife came into the kitchen where I was doing some dishes, and with an excited look on her face she said “I’ve got a photo opportunity for you!” The last time she said this sort of thing it resulted in this picture, so I quickly grabbed my camera and followed her into the garage where she had been putting away some of the kids’ toys. We carefully crept around to the back of our vehicle where she pointed at a small praying mantis perched at the top of the wheel well, and I immediately realized why she was so pleased with her find. I don’t think I have ever seen a mantis up close and personal except for a nature conservatory, and was thrilled to find one just sort of hanging out and relaxing right in our garage. I smiled like a kid on Christmas morning and she said “I’ll leave you to it” so I spent the next 20 minutes trying to get a good picture of the little insect.

The first thing I did was put on a +4 filter as I knew I would want to get closer to the mantis, but not so close as to obscure all its features. A +10 filter would have been overkill while a +2 wouldn’t have done much at all, and sure enough the +4 worked admirably. The light in our garage was fairly dim and I didn’t want to open the door because the creature might see that as an opportunity to exit the premises, so I grabbed a flashlight and set it on the floor about a meter away from the mantis with the head angled up so as to provide a bit of light. My 50mm lens was on my D7100 so I took a few shots with that but soon switched over to my D750 because I was shooting at such high ISO values in the dim light, and I also wanted to take advantage of its highlight-weighted metering system to help get the right exposure. More on that in a bit.

The situation presented a compositional challenge right from the get-go because it was more than a little awkward to position myself in a way that would allow me to even get a decent picture. I wanted to get the eyes and face of the mantis in focus which meant I had to shoot from below, but with my 50mm lens and filter I had to be somewhat close to the bug as well. I ended up lying on my back and propping myself up with one elbow while holding my camera against my eye with the other hand and scooting around until I had at least somewhat of a decent composition. It wasn’t the most comfortable way of shooting, but it did give me a composition that was at least decently close to what I was going for.

As for the metering system, I knew that with my flashlight providing most of the light for the mantis it was going to be tricky for my camera to figure out the exposure values to use since some parts of the scene (like the bug’s face) were so bright and others were so dark. The D750’s highlight-weighted mode basically looks at the entire scene and figures out which parts are the brightest, and then adjusts the exposure accordingly so those bright spots look normal. It’s a mode that I don’t use very often, but is super handy when I need it such as a situation in which there is a praying mantis hanging out above my car tire :) I could have also just shot the picture normally and then used exposure compensation to dial things down a bit so the mantis wasn’t so blown out, but the other method worked fine so I went with that.

When I was finally satisfied that I got the shot I was looking for I called my wife back in the garage where we opened the door and coaxed the mantis outside. He had done a fantastic job of letting me get close enough to take his picture, and we wanted to make sure to let him go free before the sun went down completely so he could go find some buddies and chill out after such an intense modeling session.

Sunrise Spider

Sunrise Spider

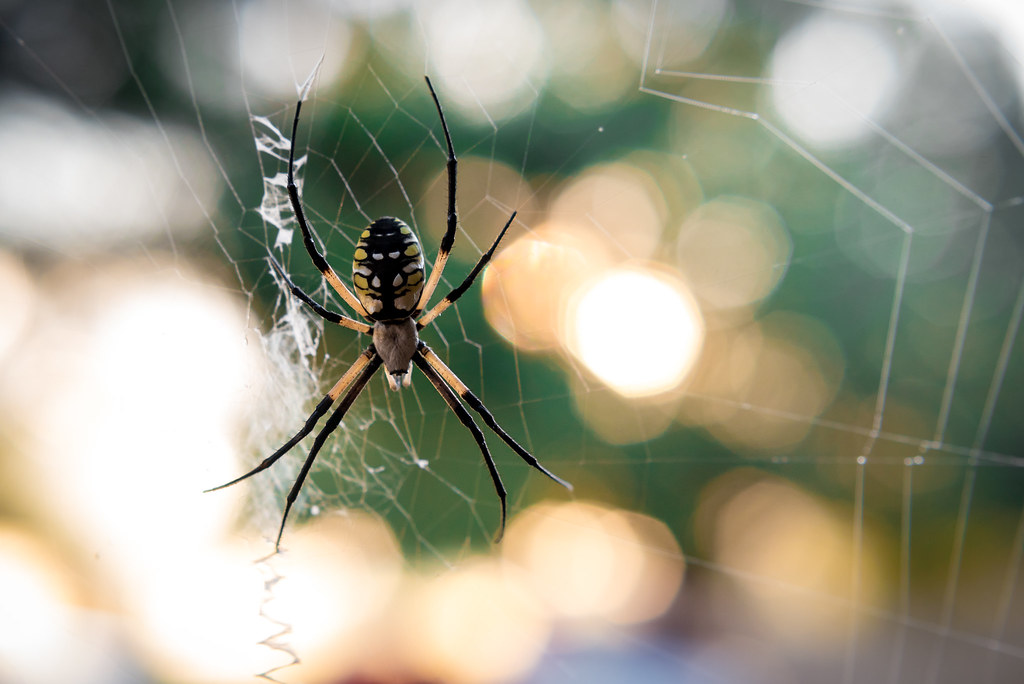
Keen readers of this blog might have noticed that each year around this time I post a picture or two of a spider, and if you have been wondering when the 2016 edition of such a photo might show up…well, here you go :) The ones I just linked to were all taken right in my own back yard, and this week’s picture was shot only a few feet away from where I made the backlit image of a spider at night. I guess it just goes to show you how rich and vibrant nature can be even without leaving your own property. Though in this case I must give credit to my wife who actually spotted this year’s spider, and had she not said something I might have knocked its web into oblivion by accident while we were clearing away some shrubs in the yard.

As you might have guessed, one thing that makes this particular spider different from any of the others I have posted is that this time I had my set of close-up filters to play with. I knew a +10 filter would be way too much, and the spider’s body would fill the frame and leave no room for the legs or anything else. A +1 or +2 would probably not do a whole lot, so I set out with my D750, 50mm lens, and +4 filter. The results were fantastic, if you don’t mind me saying so. This is the type of picture I wish I could have gotten for the past three years, and to finally be able to take it was a huge personal victory for me. Looking back on the other images I can clearly see a progression in terms of composition, framing, and lighting and I think one could draw a pretty direct line from those earlier images to this one in terms of an overall learning curve. Not that it’s the end result, mind you, but just another step on what I guess you could call my own photographic journey. Certainly I have a ton left to learn (especially since I don’t even have a true macro lens for shots like this) but this image was nice validation that I am learning more along the way, bit by bit.

This picture was taken on a Sunday morning as we were all getting ready to go to church but we had just a few minutes to spare before loading the kids up in the car. The boys and I went outside to check on the spider, which we had seen and photographed the night before after we fed it a cricket:

dff_8157small
Overnight the spider had evidently finished off the cricket and, as this kind of arachnid usually does, kicked the carcass out of the web and subsequently rebuilt any damaged threads. When we went to view it in the morning it was hanging out, literally, on its newly-refreshed web enjoying the sunrise and waiting for an unsuspecting moth or other insect to wander into its silky trap. With the sun peeking over the horizon there was a window of just a few minutes where I knew the spider would be nicely backlit so I took a few dozen shots, some at f/4 and some about two stops smaller, and was quite pleased with the majority of them. In fact the only real problem I had with the photo was choosing which one I liked, and enlisted the help of my wife with her keen eye for color and detail who also helped me decide to crop the picture so the spider is just a bit on the left side.

I tried hard to compose the picture in such a way that the glowing sunlight poking through the trees would serve to frame the spider itself, and I think the end result works out quite well. A few minutes later the sun had risen past the treetops and this particular photographic moment had vanished, but I was glad I could catch it for posterity. In the days after this picture was taken my boys and I continued to keep our garden spider well-fed thanks to a steady diet of crickets and grasshoppers we found in the yard and while it did hang around for a while it eventually went wherever spiders go in the winter. Who knows…maybe it will show up next year for another round of spider pics :)

Knotted


Knotted

This picture was a bit of a departure for me in that I normally take close-up pictures of things in nature (flowers, plants, bugs, etc.) but when I was out walking around Theta Pond on campus one day I came across the rather innocuous scene of a young tree held in place by a few stakes and some rope. It’s quite common and, honestly, quite unremarkable and yet I thought I would see what I could do with my D7100, 50mm lens, and +4 close-up filter of which I have become quite fond. That particular filter, I have discovered, strikes a nice balance between allowing me to focus much more closely than normal without getting too close and thus obscuring far too much of the background or the rest of the subject.

One of the most important things I a continue to learn about photography is the power of restraint: You don’t always need to shoot at f/1.8. You don’t always need to shoot at ISO 100 or 6400. You don’t always need ultra-close macro-style magnification. You don’t need to take 100 shots when 10 or even 1 will suffice. You don’t need to share every single photo online. The list goes on, and because this lesson is something I am rather slow to learn this picture is not one that I would have ever gotten six months ago. I would have used my +10 filter (to get super close!) and shot at f/2.8 (to get super shallow depth of field!) and the result would have been a blurry disaster. Instead after learning to hold back and taking a more considered approach, I shot this image using my +4 filter at f/8 and got a much better picture.

I like the simplicity of this picture, with just two elements (the post and the rope) and a clear point on which the viewer should focus, that of the knot itself. I like the telltale signs of age: a fraying rope, rust on the edges of the post, and thin strands of a spider’s web. I also like how there’s a clear sense that something is happening here, or at least I hope it’s clear. The rope isn’t just dangling from the post, but being stretched tight as outside forces are clearly acting on it. It is serving a purpose, whatever that may be, and despite its ragged nature it continues to dutifully hold on. To hang in there, if you will, regardless of what else happens around it. I don’t know that there is any grand metaphor or larger story to tell here, but I am quite pleased with how the final image turned out.

I also tried a few things in the editing process in order to get just the right look I was going for. This is the original unprocessed RAW file:

dsc_7517-2
It’s OK but not great, so I made a couple key edits in Lightroom:
  • Adjust White Balance to 6300K
  • Added just a bit of vignette
  • Lowered highlights and black levels, raised shadows and whites just a bit
  • Adjusted the tone curve from a straight line to more of an S-shape to add some contrast
  • Adjusted the tint of the green
  • Lowered the overall saturation of the image
And a few other things too. None of these were all that dramatic but the resulting picture is much more impactful because of it. In fact even learning to properly edit a picture has been an ongoing exercise in restraint, and I have had to learn the hard way that a few subtle edits are generally much more impactful than upping Clarity, Saturation, and Contrast. Basically if you were to assign a theme to this whole blog post it would be that less is more, both in photography and in editing, and it’s a lesson I will likely have to continue learning for many years to come :)

Sunday, 11 December 2016

Introduction to Taking 360 Degree Photos


The rise of Virtual Reality has brought about an unexpected innovation in the world of photography, the 360° photo. You may have come across a 360-degree photo or video on Facebook, which began accepting the new type of photo early this year. 360-degree photos allow the viewer to interact with the image and explore the entire environment around the camera that captured it.

Anyone can create 360 photos and share them on social media, but to do so you’ll need to invest in a purpose built 360° camera. These cameras have two or three lenses each facing a differing direction; the 360 photos are created by stitching the images captured by each individual lens to create a full 360° image.

This is what a 360° photo looks like before it is stitched together:

360° Cameras


You may be wondering if 360 photos require advanced equipment and years of training to produce. A few years ago this may have been the case, but the relentless advance of technology means that taking a 360 photo is just as easy as shooting with a compact camera.

This year has seen the release of several consumer 360 cameras aimed at everyday people who want to take immersive 360 photos. These cameras are user-friendly, priced competitively, and only require a few minutes to learn how to use effectively. Some brand names you might like to note down include the Samsung Gear 360, the LG 360 Cam and the Ricoh Theta S; these are all 360 cameras that have proven popular and they are relatively inexpensive.

In almost all cases you’ll need a smartphone to make the best use of your 360-degree camera, as each one has an accompanying app that allows you to preview the image and control camera settings. The camera and app connect wirelessly and then you simply use your phone screen as you would a normal camera screen.
Tips and tricks for shooting 360 photos

One of the exciting things about 360-degree photos is that they require a new set of skills to shoot successfully. For a start, you need to remember that the camera will capture everything surrounding it, so if you don’t want to be seen you will need to hide out of view and make use of the timer feature.

When setting up a 360 photo, consider the fact that the viewer will be able to explore the whole image, so try and find a location with plenty of interesting features.

A must have accessory, that should be used with every 360-degree camera is a good tripod. It is essential that the camera is stable and still when shooting in 360 degrees, otherwise, the image may become distorted. I recommend using a tripod that has little in the way of gears and levers at the top, or they may be visible in the 360 image. I have found that a studio light stand is very well designed to be a tripod for a 360 camera.

When shooting a 360 photo try and ensure that there are no objects too close to the lens, this makes it much more difficult for the camera to stitch the images together accurately.

Your turn

These basic tips will get you started, but the only way to become a proficient 360-degree photographer is to get out and start shooting yourself. The reward is the opportunity to create truly unique images.


Saturday, 10 December 2016

Trust the Fungus


Trust the Fungus

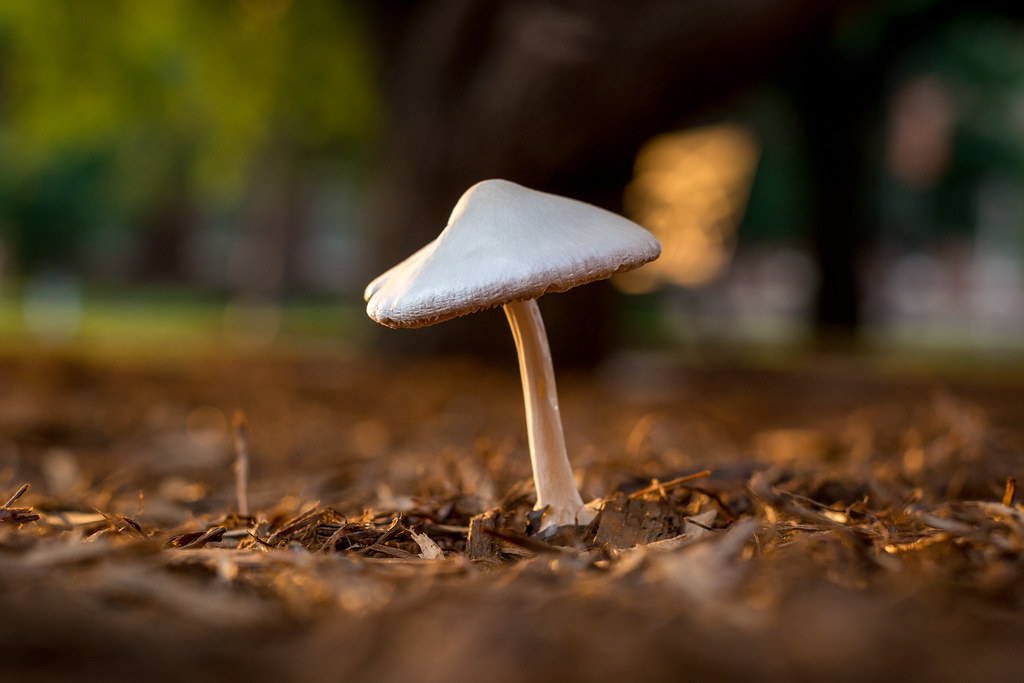
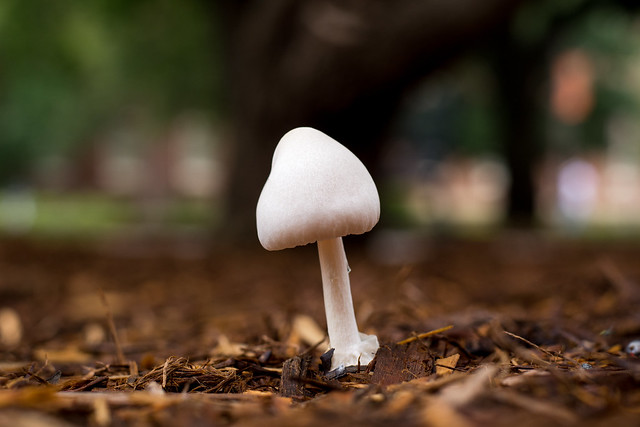
I got this picture quite by accident, as I certainly had no intention of waking up in the morning just to take a photo of a mushroom. Though come to think of it, that might actually be kind of a fun thing to try. Hmm. This image, however, was almost an afterthought and was only possible because of one of my cardinal rules of photography: bring your camera with you. I take my camera to work with me almost every day because I never know when I might come across some type of photographic opportunity, and as often happens I tend to find them more often than not. The day before I took this picture we had one of those rainy, overcast days that is just ideal for taking pictures and I saw a little mushroom poking through the ground cover just outside my office.

Resurgence

It was an interesting picture, or so I thought at the time, because of the way the relatively diffuse lighting cast a nice soft glow over the whole scene. I had to put my D7100 on the ground and use Live View to get this shot (a case in which my D750’s flip-up screen would have been much more useful if only I had that camera with me) and deliberately framed it with the tree in the background in order to give the subject a much greater sense of contrast. I liked this original just fine, and was honestly thinking about putting it up as a Weekly Fifty picture until the next morning.

As I rode my bike up to the office the following day I saw that my little mushroom friend was still there but had opened up a little more, as mushrooms are wont to do, and I figured I would use the opportunity to revisit the picture from the previous day. Just as I was adjusting my camera on the ground and trying to keep everything as similar as possible (same general composition, same aperture of f/4, etc.) a bit of sunlight started to peek out from behind a building on campus and gave the mushroom a fantastic yellow glow around the edges. I took three shots, reviewed them for focus, packed up, and went about my day. Later as I was editing the image I was struck by how much that touch of daylight added to the image, and how it turned what was originally a pretty decent (in my opinion) shot of a mushroom into something kind of special. The morning glow permeated the background and gave everything a nice warm touch that was sadly lacking in the original.

I’ll probably pass by this little bit of fungus on my way home and, if past experience has taught me anything, it will probably be wilting away. That’s how these things go though, and I’m glad I got the chance to capture it in its prime. Sure it’s just a boring simple mushroom, but I thought it made for a cool picture anyway.

Il est fini


Il est fini

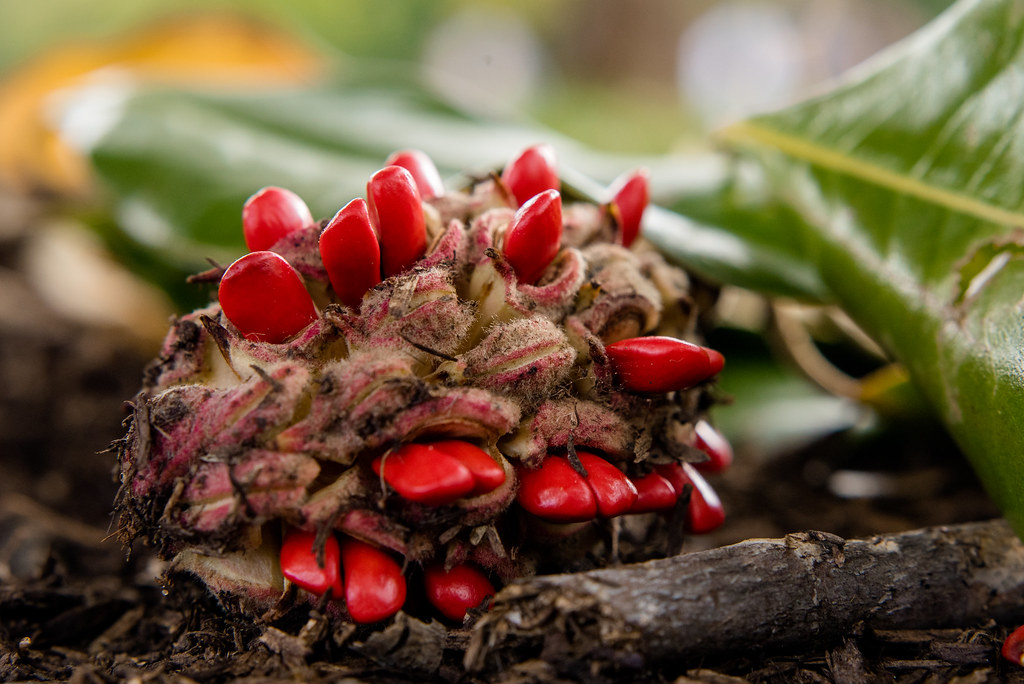
Well here you have it folks, the final in my long-running series of pictures of the magnolia tree. It’s almost a compulsion at this point since their flowers and seed pods are so…well, I guess they kind of run the gamut from beautiful to curious to downright frightening. But wherever you stand on that spectrum it’s hard to deny they make for fascinating photo subjects! These trees are scattered all over campus, and indeed all over town, and it’s hard to not take pictures of their flowers and seeds over the course of a year. Since this was the first season that I had my close-up filters to go on my 50mm lens I just couldn’t resist documenting the transition from bud to flower to seed, with this being the final image in the series. I hope you like it :)

These seed pods usually start falling to the ground in late October and as I went out with my camera to capture a picture of one I had a couple goals in mind. I knew I wanted to find a pod with several bright red seeds sticking out, and I knew I wanted it to be already on the ground as opposed to still attached to a tree. I was hoping to get a bit of dimension to the picture in terms of foreground and background, and I purposely took my +4 filter so I could get close without getting too close. It took a few days but I finally was able to capture the image you see here and I am quite pleased with how it turned out. I took a different photo a few days prior to this one that was OK but not quite what I envisioned, so I went back out and was able to get this one which was much closer to what I was picturing in my mind.

One nice thing about my D750 is the flip-out screen which doesn’t come in handy all that often, but when you need it it sure is useful. I set my camera on the ground and used Live View with 100% magnification to make positively sure the shot was in focus how I wanted, and got a shot that would have been very difficult if not impossible with the optical viewfinder alone. I think it also helped to have a clear vision for exactly what I was going for when I went to take this shot as it made the process more streamlined and…well, focused, if you excuse the pun :)

I shot this at f/5.6 and a few others at f/2.8 but really liked the wider depth of field and sharpness of the former vs. the latter. In my view it has just the right amount of foreground and background blur, and it illustrates the less-is-more lesson that I have been learning for years when it comes to things like shooting with larger apertures. Anyway, if you are tired of the magnolia seed photos rest assured you won’t see any for a good long while but come next Spring we’ll have to see what happens…

Black Cotton


Black Cotton

This photo was directly inspired by my cousin Beth who recently (well, as of the time I write this) uploaded her 2000th image to Instagram:


I begin almost every day with the same routine: get up long before my wife and kids, shower, spend about 5-10 minutes in quiet prayer, eat breakfast, and then play a video game or read a book until the rest of the family wakes up. On a quiet morning in mid-October I found myself looking out the glass door on the south side of our house as I prayed, and in what was kind of a strange moment for me I asked the Lord for inspiration. I had been feeling a bit down, photographically speaking, and was having trouble finding motivation to get out and take pictures. It was only an hour later that I saw Beth’s post on Instagram and it was just the spark for which I was looking. I thought to myself “That image is so beautiful, I want to go take one like it.” So I set out later that day with my D750, 50mm lens, +10 and +4 close-up filters, and went to take a picture like the one I had seen earlier.

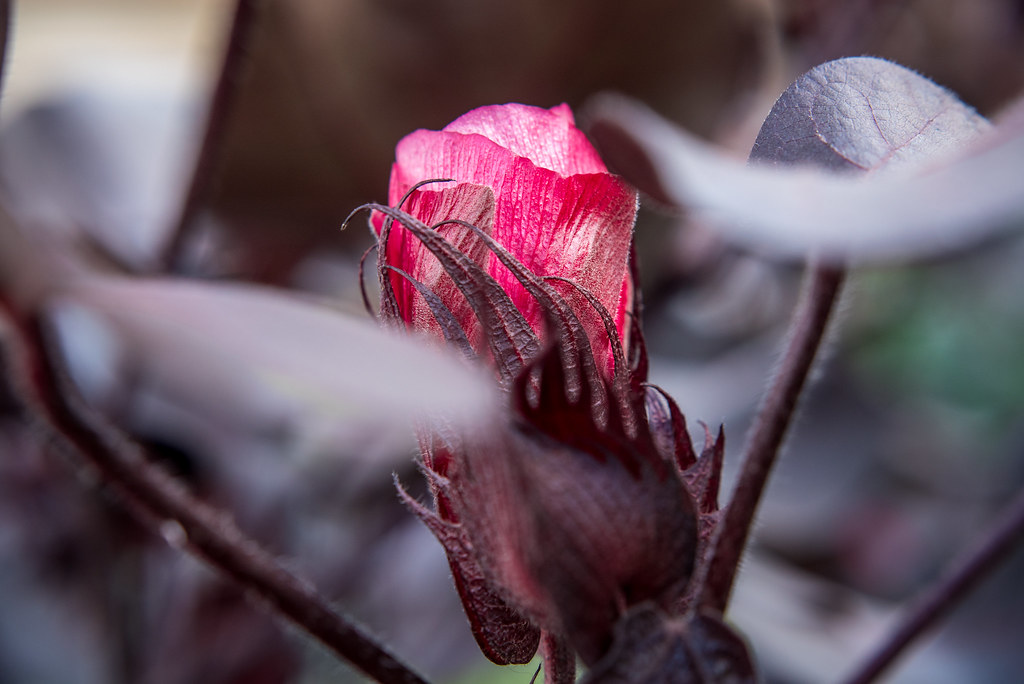
The result of my brief photographic excursion is this image of a Black Cotton flower which, ironically, has very little in common with Beth’s picture. It was hers that sent me on the journey though, and that’s what matters. I have tried, mostly in vain, for years to get a close-up picture of an insect like a bee or butterfly resting atop a flower and you will note that I still have yet to succeed. But going out with that goal in mind, sort of like my recent picture of a couple of bikes, helped focus my mind and give me a clear idea of what to aim for with my camera. Before I shot this picture I took a few others of a small pepper bush and a diamond delight plant at the Price Family Garden and was not extraordinarily pleased with the results I was getting. I was about to leave the garden altogether when I saw this pink flower cradled between deep purple leaves and knew that it was going to make for a good picture.

I knew my +10 filter would put me too close and remove any sense of context, so I used my +4 and shot at f/5.6 to get the flower in focus but leave the foreground and background nice and blurry. My goal here was to get a sense that this flower is nestled, almost hidden, among the rest of the plant and that the purple fringes surrounding the crimson petals would look like the fingers of a hand delicately holding it in place. I was very pleased with how sharp the final image looked and didn’t use much post-processing on it either, preferring instead to let the image stand on its own.

Beth, if you’re reading this thanks for the ideas you constantly send my way. And to everyone who might be reading this and looking for ideas and inspiration, I hope you find it one way or another and that right soon :)

Friday, 9 December 2016

Focus Stacking Tutorial for Landscape Photography

A lot of landscape photographers are interested in focus stacking — combining multiple images of the same scene, each focused at different distances, into a single photo. This is a useful tool to have at your disposal, since it lets you take pictures in more situations than you otherwise could. For example, if elements of your photo are very close to your camera, focus stacking may be the only way to get a sharp shot. Although I don’t use this technique for every photo, it’s something that I keep in mind when I’m taking pictures in challenging conditions. This article gives an overview of focus stacking for landscape photography, including step-by-step instructions on how to focus stack photos in Photoshop. All of these tips are also relevant for other types of photography, not just landscapes.

1) What Is Focus Stacking?

Focus stacking is an interesting development of digital photography, and, more specifically, digital post-processing.
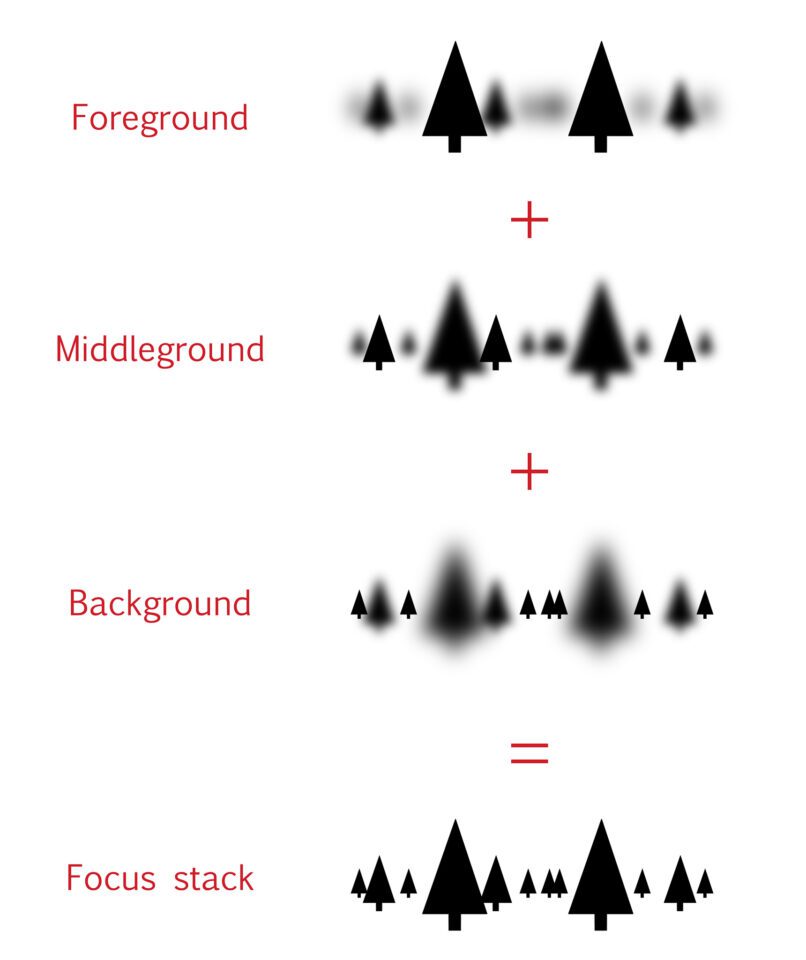
Focus stacking lets you take several photos of a landscape, focused at different points, and combine them together into the sharpest possible image. For example, you may take three photos at a particular scene: one focused on the foreground, another on the middle-ground, and a third on the background. Then, you can take the best parts of each photo and combine them into a fully-focused image.

Focus Stacking Diagram
You can focus stack with any lens and camera, but you need to have the right post-processing software to combine the photos together. I use Photoshop, since that’s what I already own, but there are better programs out there if you do a lot of focus stacking — Helicon Focus and Zerene Stacker being the two main products. However, if you only do occasional focus stacking, Photoshop’s tools should be fine.

2) Why Focus Stack?

There are two main reasons why you might want to focus stack a landscape photo.
First, you could be photographing a landscape that has too much depth. In other words, some parts of the scene are too close to your camera, and they’re out-of-focus if you shoot just a single photo. This can happen if your foreground is very close to your camera — there’s just no way to capture a focused foreground and background in one shot (even at small apertures like f/16).
You’ll also run into sharpness problems when you use telephoto lenses for landscape photography. Because they have such a thin depth of field, telephoto lenses will cause some blurriness in all but the most distant landscapes. Again, even an aperture of f/16 may not give you enough depth of field.
For me, that’s the most common time that I use focus stacking — when there’s no other way to get enough depth of field. In fact, I shoot most of my focus stacks at f/16, since it means that I don’t have to take as many photos (more on that later).
However, there’s also a second reason why some photographers focus stack, and it’s equally valid.
Because all lenses have a sweet spot, there will be an aperture that gives you the sharpest possible photo. For a lot of lenses, this sweet spot will be somewhere from f/4 to f/8. Unfortunately, those apertures don’t always give you enough depth of field, so you have to compromise.
Or not — that’s the other reason to use focus stacking. If you want the absolute highest image quality of a given landscape, you can use your lens’s sharpest aperture and stack together as many shots as you need. The downside, of course, is that you need to take several photos per scene to capture all the depth of field.
In the end, you should only focus stack if you require more detail than the camera can capture in a single photo. You might create huge prints, do a lot of cropping, or work with landscapes that have an unusually large depth of field. Regardless, focus stacking helps you get the last little bit of image quality that you can.

3) When Can You Use Focus Stacking?

Of course, nothing is a free ride. On one hand, compared to a single photo, focus stacking takes up more time and memory card space. Plus, not all landscapes even work for focus stacking.
For example, think about a wave rolling into shore. It’s not a problem to take a single photo, but focus stacking is essentially impossible — the wave will move too much from frame to frame. This is true in many landscapes with fast-moving subjects. The more quickly a scene changes, the harder it is to focus stack.
If the landscape isn’t moving too much, though, you can focus stack most of the time. Of course, this is only true if you’re willing to go through the effort of capturing multiple photos at once. The more often that you focus stack, the longer you need to spend working on every shot you take — both in the field and in post-processing. If you use focus stacking 100% of the time, you’ll run out of space on your memory card much faster than usual.
That said, if you have to use focus stacking, it’s a great tool. Don’t avoid it just because it takes time; in the end, it’s worth the effort for certain scenes. So, how do you focus stack? That’s covered in the next section.

4) How to Focus Stack Landscape Photos

Focus stacking isn’t hard, but it definitely requires more effort than when you take single photos.
To start, you need to employ best practices in the field. What does this mean? Quite simply, you have to take photos in a way that your stacking software can recognize easily.
First, you should use a tripod. Although it’s possible to shoot handheld focus stacks, it will increase the likelihood of difficulties in post-processing.
Second, make sure that you don’t change the focus too much from shot to shot. For example, if you only take two photos — one focused on the foreground, and one on the background — the middle of your photo could be blurry! Even if your post-processing software still blends the shots together, the final image won’t look very good.
When you’re in the field, it’s best to focus on the exact spot in the prior image where sharpness first starts to decrease. You might need to zoom in on live-view in order to do this properly. By doing this, you avoid an unnatural-looking final result.
Now that you’ve taken your photos, it’s time to start blending them! Here, I’ll demonstrate how to focus stack in Photoshop, since that’s the software you’re most likely to have. (If you have Zerene Stacker or Helicon Focus, you’ll have a bit more control over the process.)
Before you open the photos in Photoshop, you need to make sure that they are ready to merge.
Specifically, ensure that the brightness of all your photos is the same — otherwise, they won’t merge properly. Normally, this won’t be a problem, but you might notice a brightness difference if the light was changing quickly from shot to shot.
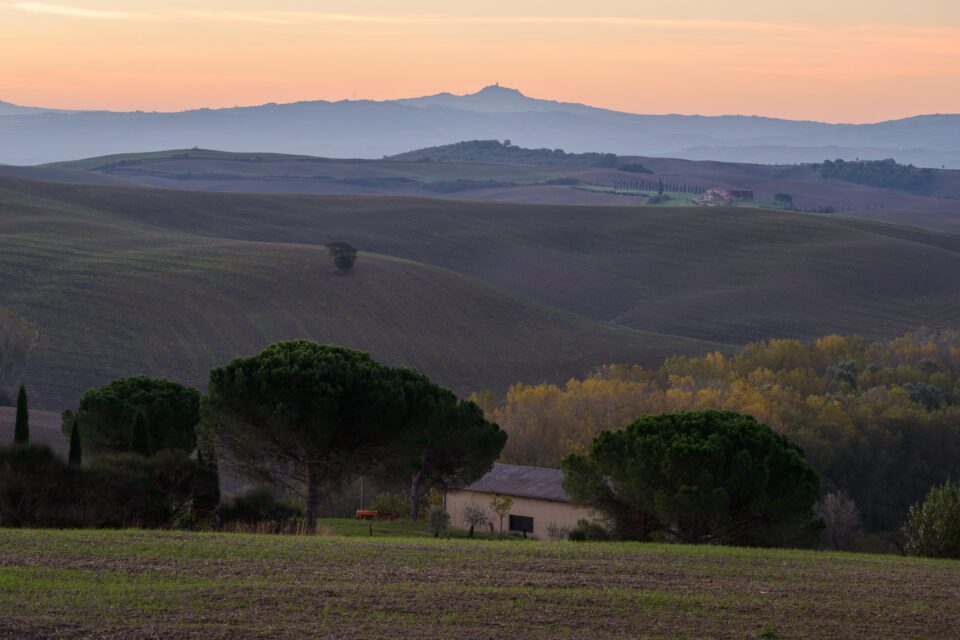
The photo below(along with six other photos focused at different distances) is part of the focus stack that this article covers. I took these images at f/5.6, which makes it easier to see the thin depth of field:
Here’s the focus stacked result (unedited — final version at the bottom of the article), where everything is incredibly sharp:
Focus Stack Unedited
This is the unedited version of the final focus stack. You can see how much sharper it is than the prior photo — click on the two images if you want to compare them larger.

5) Focus Stacking Checklist

Now that you’ve taken your photos, it’s time to bring them into your post-processing software. Here’s a quick checklist that can help if you use Lightroom and Photoshop:
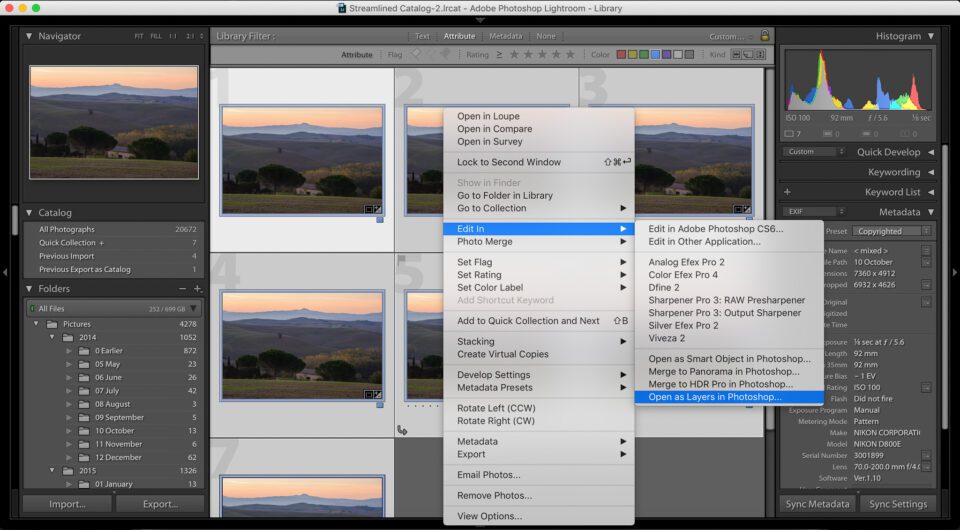
  • First, open all of the images in Photoshop. You can do this by entering Lightroom, highlighting every shot, then clicking “Open as layers,” as shown below:
Focus-Stack-Screenshot-1
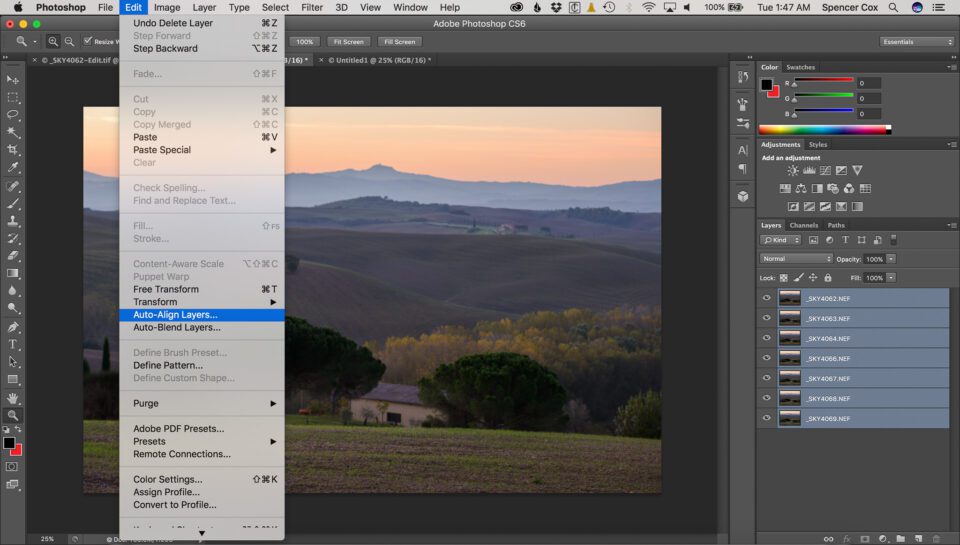
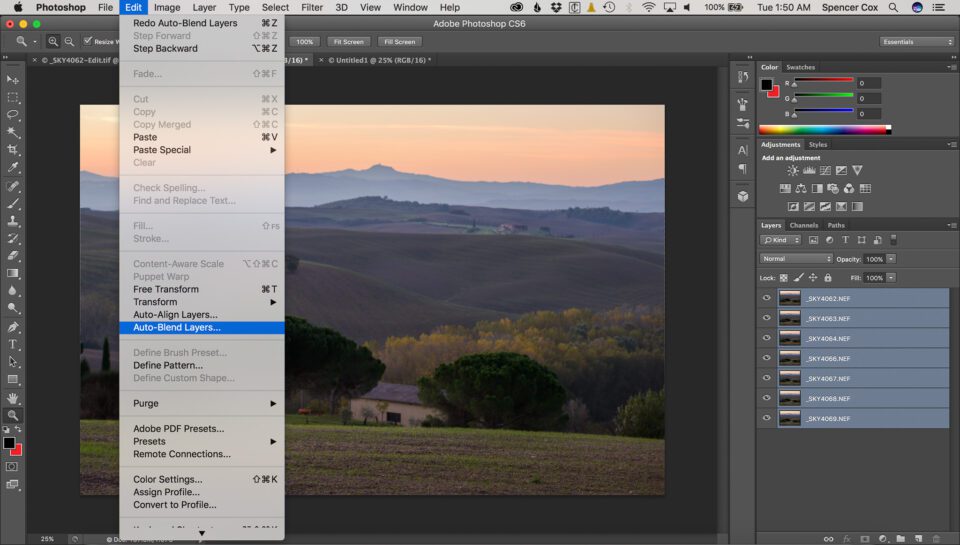
  • Once your photos are in Photoshop, select all the layers, and click Edit > Auto-Align Layers. In the next window, you can leave the blend mode to “Auto”:
Focus-Stack-Screenshot-2
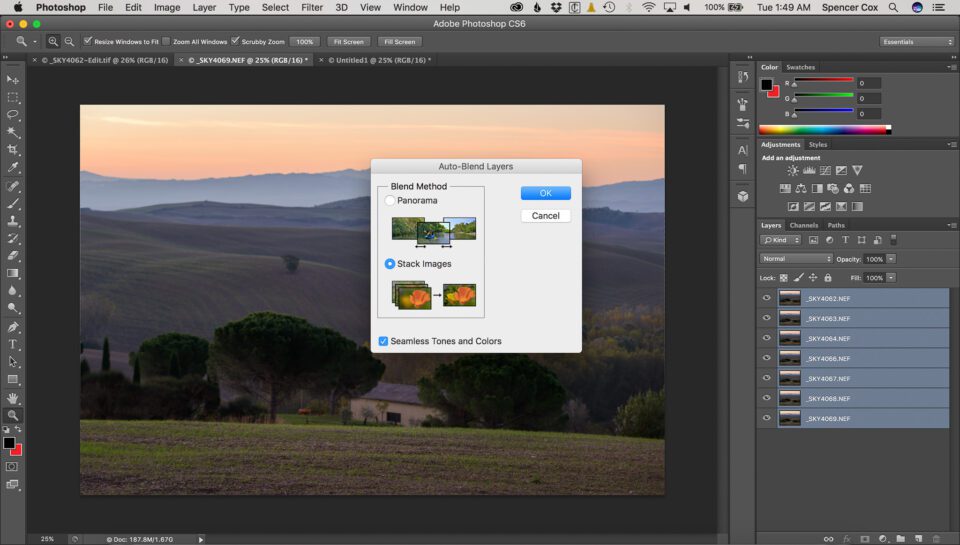
  • Now, click Edit > Auto-Blend Layers, and then “Stack Images,” as below:
Focus-Stack-Screenshot-4
Focus-Stack-Screenshot-3
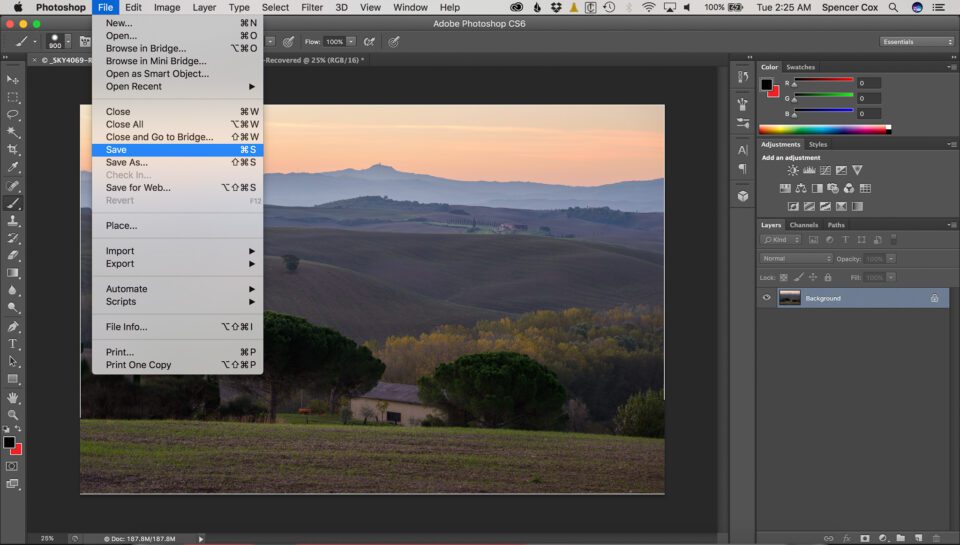
  • Click Layer > Flatten Image. Save the photo by clicking Control + S (Windows) or Command +S (Mac), or just File > Save. That sends the completed version back to Lightroom:
Focus-Stack-Screenshot-5
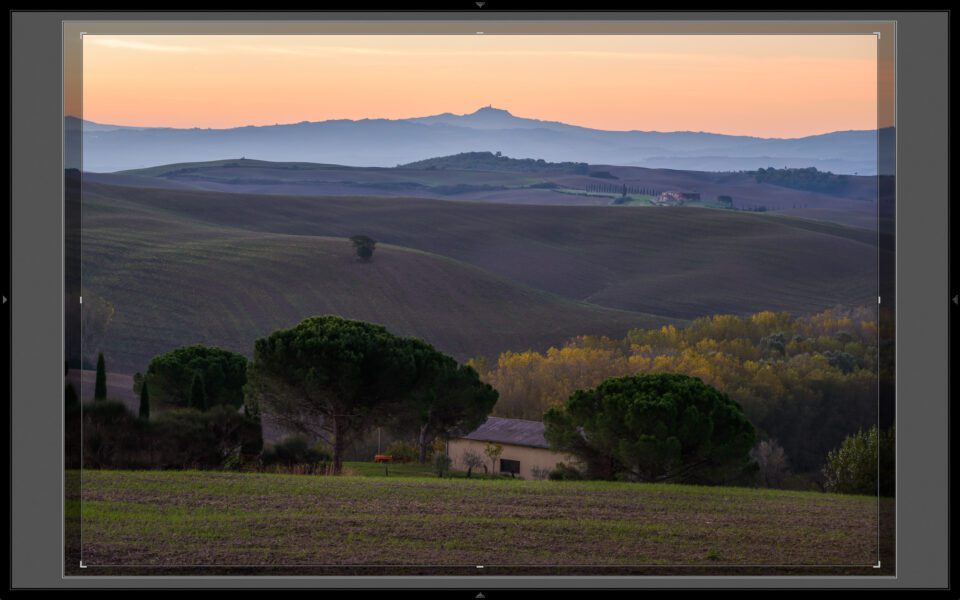
  • Open Lightroom again. Now, you need to crop the photo so it looks good. Often, the edges of your image will have large sections that are extremely blurry — you need to crop those out. Here’s how that looked for this particular focus stack:
Focus-Stack-Screenshot-6
  • Finally, once you’re done cropping, just clean up the image and edit it however you want! There’s no wrong way to proceed from here. You’ve already created a focus-stacked image.

6) Conclusion

Although focus stacking isn’t something you should do all the time, it’s an important tool to have at your disposal.
Sometimes, you may use a telephoto lens and have difficulties getting everything in-focus. Or, you could have a landscape that stretches so far that even f/16 doesn’t have enough depth of field. Finally, if you’re interested in nothing but the top sharpness, you might focus stack a landscape simply to use your lens’s sharpest aperture (like f/5.6 or f/8) rather than a smaller aperture which has diffraction.
There is no right or wrong reason to focus stack, but be aware that you can take this technique to levels that might not be worth the effort. When I first learned about this focus stacking, I tried to use it on every landscape that I shot, simply to get the sharpest photos. Unfortunately, this meant that each photo took five times longer to capture! I ended up with sharp photos, but I didn’t get as much variety in my shots, and my work suffered as a result. Now, I’m more likely to use f/16 than to focus stack at f/5.6. If focus stacking works well for your personal style, though, that’s great — don’t let me discourage you. It just isn’t the case for everyone.
Hopefully, this helped provide a good platform for you to start focus stacking your own shots! If you haven’t tried it before, give it a go. For certain difficult landscapes, focus stacking is an incredible tool.