Thursday, 16 February 2017

An Apple a Day Keeps Creativity Awake


Do you find yourself lacking inspiration? Without new ideas? Or just unsatisfied with your average looking images? Pablo Picasso – the famous and talented artist – once said, “Inspiration exists, but it has to find you working.” This exercise is designed to help you achieve exactly that, and awaken your creativity.
An old English proverb says, “An apple a day keeps the doctor away”. So following this principle I came up with a routine for your photographic health. Something to keep you busy so that inspiration can find you working, as Picasso suggested.

Step 1: Photograph an apple

An Apple a Day Keeps Creativity Awake


Why an apple? Well, because I found that many times the excuses that we use are linked to the idea that we don’t have an interesting subject, or a nice-looking one, or an expensive one, in other words something worthy of photographing. So don’t procrastinate at the market looking for the perfect red shiny apple that looks like one from a fairy tale, just get an apple. An apple is something we all have access to. It’s not particularly expensive, and as you will see, also very versatile.
The first part of the exercise is to photograph your subject, in this case the apple without altering it. In other words, you are the one who is going to adapt in order to get the most out of it. For now you don’t have to worry about the technical part, so you can just leave your camera on automatic mode and shoot away. Photograph your apple from the top and from the bottom; from afar and in macro; with a wide-angle lens and a telephoto – anything you can think of.
Once you have done this and you can’t think of any other ways to photograph the apple, push yourself to do at least two more. Yes, it may take some time to come up with them, but trust me, those will be the best ones! Why? Because photograph has been around for almost two centuries, and lately thousands of images are done everyday, so most likely the first images you can come up with, are also the same ones everybody thinks about. That is why you need to come out of your comfort zone and exercise your photographic mind and eye.
As you can see, the color and exposure on each one is different. This is because the camera was set on automatic mode. This way the settings adjust to the information it’s receiving. If most of the frame is covered by the warm colors of the apple it sends different information than a frame mostly covered by the white background. This is why the next step is very important.

Step 2: Put your technique to good use
An Apple a Day Keeps Creativity Awake

Now that you have found the best angle for photographing your apple, you can move on to the next level – make it professional!
When you had your camera on auto mode it made the decisions by itself. Let’s be honest, with the cameras that exist on the market today, it’s very easy to get a well-exposed photo. However, what I always say to my students is, “We learn photography not to make it good, but to make it our own.”
If you use the automatic mode of your camera, it might come out a good photo, but it won’t be your photo, because you didn’t make any of the decisions. In this part of the exercise you need to put your photographic knowledge – no matter how much that is – to good use.
If you know about bracketing (the process of making the same photo with different exposures) then do that.
If you know about lighting, then play with your lights. Use a direct flash to create a hard shadow for one image, then use a flash and a reflector to soften the shadow, and so on. Even if you don’t have a professional set of lighting gear you can always play with artificial light from lamps and natural light from windows. The point is to use your tools and techniques to make your photo the way you want it to be and not just another snapshot.

Step 3: Get creative

An Apple a Day Keeps Creativity Awake

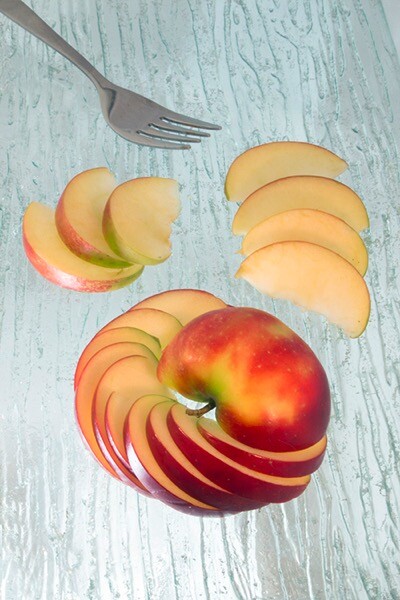
Now it’s all about the finishing touches. It’s always important that you are able to produce a technically good and unique photo of an object/subject. But how about getting a bit more creative? Try to tell a story, to set a mood, or to use the apple as a metaphor, anything goes! 
Once you have your best angle and your light and settings selected, it’s time to decide what you want to say with your photo. Do you want your photo to be yummy and inviting? Maybe cut the apple and plate it on a beautiful table. Do you want it to be about health and nutrition? Maybe add some other fruits to the set.
If you want to push yourself a little bit more then try to tell a story, maybe make a photographic series. Think about Snow White or Adam and Eve, in both cases the apple plays an important role. Do you want it to be conceptual? Think about life and death for example using a fresh and a rotten apple. You can do anything you want just by adding some elements, add some context, and get creative!
Today for me it was a healthy, ready-to-eat snack!

Conclusion and what’s next

An Apple a Day Keeps Creativity Awake

Great work! I hope you enjoyed your apple for today. Tomorrow maybe go with an orange, or a dog, or a self-portrait. You can apply this three steps to everything, or stay with the apples and see how far you can get, the important thing is to exercise every day.

Thursday, 2 February 2017

How to Pause and Learn to Make Fewer and Better Photos

At the end of each year do you find yourself with thousands of photos and wonder what to do with them all? Or wondering if you should even keep them? This is a lament that I often hear in my photography workshops and have experienced the same problem myself. Sometimes, this is a result of being too quick to click. You see something that excites you photographically and proceed to snap away, hoping that you’ll cover all the bases and that at least one shot will be a keeper. Sometimes this works and you do get one that you like, but often you find yourself disappointed because there isn’t even one that truly reflects your experience.

slow down and make better photos

But what if you could take a different approach to your photography? One where you make fewer and also perhaps better photos? I’ve found that the simple practice of pausing before clicking the shutter can make a huge difference in the quantity and quality of your photographic output and enjoyment. Let’s break it down.

pause and take better photos


Pausing is the practice of checking in with oneself. When something stops you and you want to make a photograph, take a moment to notice what’s happening and ask yourself a few questions.
  • What do I see, smell, and hear?
  • What stopped me?
  • Was it a color, shape, or texture?
  • What am I feeling? What do I like about it and why?
  • Does it mirror something going on in my life at this moment?

If this sounds like navel-gazing to you, believe me, it’s not. Many photographers over the years have said that a photograph says something about the creator. Your choice of subject matter reveals a lot about you. By becoming more aware of why you photograph what you do, you will gradually uncover your photographic vision.


If you take the time to ask yourself these questions, you will become clear on what’s drawing you personally to that subject. In the photograph above, of a reflection on a car, it was the three-color harmony and the sweeping, curving lines that drew me in. It’s vibrant and airy and makes me feel like dancing.

The clearer you are on why the more clear your photographic message will be to the viewer. You get to the heart or essence of what’s there and your photograph will have a greater impact, and you’ll learn about yourself in the process.


Focus

pause, focus and take better photos


Now that you’ve clarified what stopped you in the first place – the concept or message you want to convey – it’s time to focus your attention and look closer. The contemplative monk, Thomas Merton, said, “There are degrees of attention: the glance, the cursory look, the look, the long look.” (Master of Attention)


When you’re too quick to click, you’re only taking a glance or cursory look. Consider how your photography would change if you took more long looks. You most definitely will come to a greater appreciation for your subject.

The image above shows the exterior wall of my aunt’s barn, a structure that is very old and has not been well maintained for some time. A closer look reveals its subtle beauty and rhythm.

Here are some ways to practice focusing:
Look at the details – the colors, shapes, textures, etc.
Sketch the general outline of the scene. Get the big picture.
Jot down some notes on what you see, sense, and feel.
Change your vantage point. Look at the subject from different angles and perspectives.
Identify the essential elements. Each should contribute to the main subject in some way.

Connect

How to Pause and Learn to Make Fewer and Better Photos


Finally, once you have determined the best way to compose and expose your shot, it’s time to connect and click the shutter. I think of a photograph as a visual record of the relationship the photographer has with their subject. Once you learn to pause and focus, you will have that relationship. Ask yourself a few more questions.
How should I compose this subject or scene?
Should one element take up most of the frame or should I use juxtaposition with several elements?
What are the essential elements?
What should be included the frame and what should be left out?
How is the light and how should I expose the image to best express what I’m seeing?
Should I use a narrow depth of field or have everything in focus?
Will this composition best express what I’m seeing, and most importantly, what I’m feeling?


With the image above, I spent a good amount of time pausing and focusing on an amazing rock formation off the coast of New Hampshire. I did some sketching of the whole scene (the ocean was beyond) and it was quite some time before I noticed the little pebble tucked safely inside this crack. To me, it felt symbolic. This tiny pebble was being protected by the stronger forces around it. I felt a connection and composed accordingly.

Conclusion


You may be wondering who has the time to ask these questions, especially when the moment or the light is passing quickly. That is certainly the case in some instances and at those times you must be ready to seize the moment. But usually, you will have the time. Consider it a practice that is well worth it. Eventually, the answers to these questions will become quicker and more intuitive. You’ll do them without much thinking at all.

Monday, 23 January 2017

8 Tips for Getting Great Expressions in Family Portraits


Sometimes as a photographer, you are lucky enough to get a family session full of models with perfect natural smiles in every photo. It doesn’t take much to get a photo that is ready to hang on the wall. However, most of the time with family portraits it isn’t that easy.
Maybe you’ve got somebody who doesn’t want to be there or little kids that have no idea what you’re trying to get them to do. And maybe, just maybe, you’d like to have some photos that show some extra personality. Everyone looking at the camera and smiling is nice, but I always love the ones that show a little more of who the family really is. I’ve got a few tricks up my sleeve to help you through the more difficult sessions, and to help you get some fun full-of-personality shots and great expressions with any family.


1. You’re in charge of the kids


Many times during a family session, you’ll have parents that are really concerned about whether or not their kids are looking and smiling at the camera. They don’t realize that the moment their little one looks and smiles, their faces aren’t photo-ready because they’re spending all their time wondering what their kid is doing.
Remind the parents to keep their faces ready for photos at all times, and you, as the photographer, will take care of getting their kids to look and smile. If they are talking to their child, it will be hard for their child to look at you, because he’ll think he needs to be looking at mom or dad. Whether you want the parents looking at the camera or not for a particular photo, remind them to do their part for the photo and leave the rest to you.

2. Let the parents help sometimes


This might seem to contradict point #1 above, but there are times when getting those genuine smiles from the kiddos requires a little bit of help from the parents. If you have a reluctant smiler and you want to get a good individual photo of the child smiling, ask the parent to make a funny face, or do something silly off-camera. If you want the subject looking at the camera, ask the parent to get right behind you. Parents often know one silly word that will get their child giggling, or the child might just need the comfort of seeing a parent smiling at them to know that it’s all okay.
You can also have photos with the parents interacting with their children in the frame. These often end up being some of my favorites. I love capturing the genuine interactions, and those expressions that the parent sees every day. Put the parent and child together, and simply ask them to smile at each other. Often this initially awkward directive gets them really giggling together, and you’ve got the perfect expressions.

3. Laugh at the silly one


One of my most effective prompts for natural looking family interaction and genuine expressions is to ask them to laugh at the silly one. Sometimes they all look to the same person right away, and everyone will start truly laughing. Sometimes they all look at someone different, and after a second of bewilderment, they all start laughing.
This one can backfire, though, and needs to be used with caution. Some kids automatically think that laughing means to be over the top silly, and they over-exaggerate a huge laugh that doesn’t look natural at all. Some kids think that laughing also must be accompanied by pointing, and that never looks great in a photo either. In these cases, I tell them to giggle quietly and to keep their hands down. Usually, that solves the problem. If it doesn’t, I just move on to something else and let the moment go.

4. Simply hug


Oftentimes in sessions, I position everyone into a nice arrangement, take a photo of them all smiling and looking, and then I just say, “Now, everyone hug each other.” or “Put your arm around the person next to you.” When I look at the photos side by side later, I’m always amazed at how much more natural the smiles are in the hugging photos.
I think that when photos feel really formal, it’s hard to relax, and people end up with stiff smiles. When they feel comfortable, the true smiles come out. There’s just something about being surrounded and hugged by those you love that makes you feel safe. Sometimes you need to prompt them to hug each other but make sure they’re still looking at you. Occasionally you get the real huggers that will turn right around and give their mom a bear hug. Although that looks cute in real life, it doesn’t work as well for a photo.

5. Let the personalities shine


Sometimes you might have a perfect photo in mind, but you just have some little guys that have big personalities. You could spend the whole session trying to get them to be somebody they’re not, or you can just go with it and laugh about it.
Let’s be honest, sometimes those expressions that just scream personality make the best photos. Families will treasure those photos and laugh about them throughout their whole lives. You can try to get that perfect family photo for mom, but don’t make everyone miserable by insisting on squelching unique poses and expressions every time they pop up. That said, I don’t encourage them in their silliness because sometimes that can make them go a bit out of control. Just simply take the photo, and don’t make a big deal out of it.

6. Big groups are fun too


Giant group photos can look very dull at times. When you have tons of people in one photo, it can be a task just to get them all arranged, and then after all that work the photo just looks like a bunch of little boring faces.
Try getting a few photos that are just for fun. Ask the entire group to hug or kiss their neighbor. (Give them the option. Nobody likes to be told they must kiss the person next to them.) If you have a bride and groom, you can have the bride and groom kiss, and ask everyone else to cheer or to react however they’d like.
When you have a big group of people with funny happy faces, it makes a photo that you want to look at for awhile, and you can’t help but smile. These photos are never perfect, but they’re fun, and end up being the photos the families really love.

7. Capture life


You don’t always need smiles, nor do you need all the eyes showing. Capture the family participating in an activity together, and just let their expressions happen naturally. These lifestyle photos will capture the family as they are, right now. They will be the photos that really bring back memories for your families when they come across them later. You don’t have to set up anything elaborate. It can be as involved as a picnic together with the blanket and basket and everything, or as simple as holding hands and walking together. If you do have them walking away from you, ask the family to look at each other as they walk, so you get some profile expressions, and interaction with each other.
You don’t have to set up anything elaborate. It can be as involved as a picnic together with the blanket and basket and everything, or as simple as holding hands and walking together. If you do have them walking away from you, ask the family to look at each other as they walk, so you get some profile expressions, and interaction with each other.

8. Take a lot of photos in a row


When you’ve got a lot of people to capture at once, the chances of getting all of them with a great expression at the same time is slim to none. I snap a lot of photos in a row of one pose because the chances of catching smiles and open eyes for each person go up greatly when you have a lot to choose from. If all else fails, you have a lot in nearly the same position, so you can swap eyes, faces, or heads if needed.
It can be so frustrating when you have a family photo that is nearly perfect, but one family member is blinking. Trust me, even three in a row may sometimes not be enough to get every expression that you need. I don’t head swap often because I usually have one in the series that captures everything as I want, but it’s nice to have the option of swapping something if needed.

Saturday, 7 January 2017

Weekly Photography Challenge – New Beginning


As the first photography challenge of 2017, I thought it would be fitting if we go with a theme for new beginnings. Like these 19 images show – there are many ways to interpret that theme.


By Francisca Ulloa

By Shellie
Weekly Photography Challenge – New Beginning

So, however you want to run with this idea is up to you. It could be about babies, kittens, or eggs. Or it could be around a new beginning you want for yourself this year. Maybe even a goal or resolution you want to achieve.
Share your images below:

Simply upload your shot into the comment field (look for the little camera icon in the Disqus comments section) and they’ll get embedded for us all to see or if you’d prefer, upload them to your favorite photo-sharing site and leave the link to them. Show me your best images in this week’s challenge. Sometimes it takes a while for an image to appear so be patient and try not to post the same image twice.

By Micolo J

By Andy Reago & Chrissy McClarren

By Craig Sunter

Wednesday, 4 January 2017

How to Take Senior Portraits That Kids and Their Parents Love

senior-portrait


Have you ever tried to photograph a high school senior, only to come home and discover that all your photos look awkward and stuffy? Whether you’re a professional photographer that’s being paid or a friend snapping photos in the backyard, senior portraits can be a huge challenge for photographers of all types because you have multiple clients to please.

It’s important for the high school seniors to have fun and look like themselves in their photos. It’s also important to capture images that will please their parents and fit their school’s requirements for the yearbook photo. Having lots of cooks in the kitchen can make things challenging, but not impossible. Here are a few tips for before, during, and after the session that will help you take senior portraits that are loved by both kids and parents.

Before the Session

1. Ask Questions in Advance


When it comes to senior portraits, every high school does things a bit differently. Some high schools have very specific requirements for the senior portrait to be used in the yearbook. I’ve even encountered one school that specified that all girls were to wear a black crew neck shirt with pearls, photographed with a gray backdrop, with the subject turned slightly to their left. Other schools are much more relaxed and may specify only the orientation and whether the image should be color or black and white.

Some schools require that seniors use their in-house photographer for the yearbook photo but they can use images from independent photographers for graduation announcements and other things. So, as the photographer, it is so important that you are aware of the school’s yearbook photo requirements for seniors before you even begin shooting.
Deadlines?

Also, I always ask about each school’s deadline to submit photos to the yearbook. Some schools require that photos be submitted before Christmas, other schools don’t cut off submissions until late spring. This is another situation that varies from school to school, and it’s a really important question to ask. You’d be surprised how often I get calls for senior portraits two or three days before a school’s deadline, asking if I could squeeze in a session and them assuming that the images will be edited and ready to go the very next day.

Sometimes it may work for me to squeeze in a session, with the agreement that I’ll provide 3-5 images by the yearbook deadline and the rest will be delivered within my standard time frame. Other times, I just can’t swing it. Asking the question allows me to be transparent with prospective clients, and also to help set reasonable expectations for the session well in advance.

2. Wardrobe Choices


Every photographer approaches wardrobe selection a little differently. Some ask their client to model prospective outfits in advance and help them choose. Other photographers create little handouts that include examples of what to wear (and also what not to wear). Still, other photographers prefer to capture whatever their clients show up wearing.

Your approach will likely be influenced by whether you tend to capture styled sessions or lifestyle sessions. I find myself somewhere in the middle. I want my clients to be comfortable and to look like themselves, but I also find that most people benefit from some gentle direction about what to wear for a session.
Giving direction

When it comes to senior portraits, the direction that I usually give is to bring three outfits:
One casual outfit, something like jeans and a solid colored top.
A dressy outfit; slacks and a button down shirt for the guys, a dress or slacks and a nice shirt for the girls.
One outfit that describes their senior year in a nutshell. This might be a sports jersey, a t-shirt with their favorite band, their prom dress, or it could be a really trendy outfit that they absolutely love.

For the first two outfits, I usually tell both the seniors and their parents to select medium to dark-wash jeans with no holes, and either a solid colored shirt or very classic patterns (like plaid). I also tell them to feel free to be creative and think outside the box when it comes to the third outfit. I’ve found that the parents typically prefer the images of their kids in the first two outfits, while the seniors typically prefer the images of themselves in the third outfit. In my experience, offering this simple guidance in terms of wardrobe has been the most important factor in ensuring that both the parents and the kids love their senior portraits.

3. Posing


High school seniors are in a bit of a tricky spot. At 17 or 18 years old, they want to look and be treated like adults. I really try to be conscientious of that dual dynamic. This may be my own personal soapbox, but I also try to be mindful to guide these kids through poses that make them feel like confident and strong young adults, without being overly risqué or mature. DPS has great posing guides for men and women. Take some time to scroll through and identify the types of poses that you think are age appropriate for high school seniors prior to the session!

During the Session


1. Build Rapport


As you begin your session, ask the senior more questions. If they play a sport, ask how their season is going so far. Ask about their plans for next year, or what they think they’d like to major in. Find out what they usually do on a Friday night. Get them to tell you about their favorite part of high school.

Really listen, pay attention to their answers and when they share something awesome, tell them so! Hearing praise from someone other than their parents will help build their confidence in front of the camera. More importantly, when you’re genuine with your feedback it helps build relationship and trust, which in turn will lead to more genuine photos.

2. Mind your aperture


I love seeing the images that families choose for the graduation announcements. More often than not, in my experience, that image is a head and shoulders portrait of the senior looking at the camera and smiling, with a nicely blurred background. There’s something about that sort of image that’s timeless and classic. To achieve this for senior portraits, I almost always have my aperture set somewhere between f/1.8 and f/2.5 depending on the lens.

3. Acknowledge the Awkward


Portrait sessions are odd for most people. When you add hormones, acne, insecurity, and that not-quite-adult dynamic we mentioned earlier to the mix, senior portrait sessions can feel downright embarrassing. One of the simplest techniques I’ve found has been to simply acknowledge the awkward. I’ve been known to say things like, “I know it feels weird to be the center of everyone’s attention and to be posed like a doll, but you’re doing a really good job and everything looks great so far!”

Or maybe something like, “I know this is going to feel absolutely awkward and ridiculous, but I want you to give me your biggest, loudest Santa laugh. Like this (insert ridiculous Santa laugh here).” I know it’s a weird request. They know it’s a weird request. Acknowledge the weirdness, and be willing to be an active participant in the craziness. It’s really not about the Santa laugh itself. But, if you can get them to participate, it’ll often make them smile or laugh, which is the moment you’re really waiting for.

Just acknowledging that senior photos are not a comfortable everyday experience for most kids can go a long way towards putting them at ease and capturing images that really show their personalities.

After the Session


1. Utilize Social Media


Shortly after the session, I post a preview image to my Facebook page. I try to select one that I think will please both the kid and the parents, which is often those head and shoulders portrait I mentioned earlier. Many of the images you see in this article were the preview images posted to Facebook after the sessions.

I also make an effort to post a caption for the image that captures one of the cool things that the senior shared with me during the rapport-building part of our session. My heart in doing so is to affirm and acknowledge these kids. I’ve photographed a lot of different kids from a lot of different backgrounds, and each one has blown me away talking about their passions and hopes for the future. I want them to see and hear that they matter and that they were heard during our session, as well as to encourage each of them and build them up, if only in some small way.

You’ll have to find your own groove in terms of how exactly you share images on social media, but for high school seniors especially, don’t skip this step! I’ve had more referrals for senior portraits come from Facebook than any other avenue.

2. Keep the Editing Style Classic


When it comes to editing senior portrait sessions, I try to keep my editing style clean and classic. Again, every photographer has their own niche and style, and I’m not suggesting that you change yours. I am suggesting that when it comes to senior portraits, that you be mindful of creating images that will stand the test of time. For me personally, this often means offering more black and white images than I might from other sessions and fewer images with a matte treatment.

Finally


In all, capturing senior portraits that both parents and kids love is one part preparation before the session, and one part rapport-building during the session, with a drop of thoughtful post-processing thrown into the mix.

It’s not difficult, but it does take some advance preparation. Do you have any other tips for capturing senior photos that parents and kids both love? Please share them in the comments below.

Sunday, 1 January 2017

Household Items to Bring to Your Next Food Photography Shoot


One of the most common assumptions about food photography is that hardcore food styling techniques must be involved to make dishes more visually appealing. In fact, there are professional food stylists who will employ all sorts of techniques to transform a dish into an inedible, yet highly photo-worthy subject. However, food styling techniques can also be very simple and accessible. Below is a list of common household items that can also help you out on your next food photography shoot.


For Keeping Food Clean

Tweezers


It’s pretty much inevitable that a plate of food will have quite a few moving parts that can easily fall out of place. While the Spot Healing Brush in Photoshop can make crumbs or blemishes disappear in post-production, it’s best to remove those bits and pieces from the dish before your shot is taken. This is where a pair of tweezers comes in. Use them to rearrange food on a plate or reach down into a deep glass or bowl to make adjustments.

Cotton balls

Besides being used to soak up pools of excessive liquid that might gather on a dish, cotton balls are also great for propping up food. Stuff one or two behind a piece of food to give it some leverage and height. Since they’re small and absorbent, the cotton balls can easily hide and blend into a dish so it’s not obvious they’re being used.

Q-tips


Serving a similar purpose to tweezers and cotton balls, Q-tips (cotton swabs) are important for small touch ups. Use them dry or dipped into some rubbing alcohol to remove small blemishes from a dish and you’ll save yourself some valuable time in post-production. Which leads me to my next point…

Rubbing alcohol


Throughout a food photography shoot, your props and gear are bound to come into contact with some morsels of food. Bring a small bottle of rubbing alcohol to keep your gear clean, and even consider keeping some hand sanitizer nearby to clean your hands after rearranging plates of food.

Highly absorbent paper towels


If it’s not already obvious, all of the food styling tools listed thus far have to do with cleaning and touching up dishes before they’re photographed. This tool is the last of the cleaning sort and is useful not only for wiping dirty hands after styling, but also for absorbing liquid from juicy meats, iced drinks, or other plates of food that are a touch too wet.
For Keeping Food Fresh


One of the biggest challenges for food photographers is to shoot dishes while they still look appetizing and edible. These tools will help restore shine and luster to dishes to imply freshness.

Nonstick cooking spray


Restore a bit of shininess to a dish and help it reflect light better by adding a bit of nonstick cooking spray. Be very careful, however, as a spray that is too strong might dishevel parts of your dish.

Spray bottle filled with water


This serves the same purpose as the nonstick cooking spray, but in a slightly more controllable manner as you can often shift the nozzle of a spray bottle to emit a smaller or larger stream of water.

Eye-dropper


When you need ultimate control over liquid application, it’s best to use an eye-dropper instead of a spray bottle or nonstick cooking spray.

For Applying Creative Touches


After using the above tools to perfect the details of your photo subject, it’s time to focus on two other factors that can take your photo to the next level; light control, and selecting a creative background.

Tin foil (or a large metal baking sheet)


Depending on your preferred camera tools, you may already have a reflector in your food photography kit. If you don’t have a reflector, you can use a sheet of tin foil or a metal baking sheet. If you use tin foil, you have the added bonus of being able to use smaller pieces and mold them.

Baking parchment paper

In photography, baking parchment paper can serve a couple of purposes.

First, it can be used as a cheap alternative to a diffuser (light modifier) to soften the light aimed at your subject. Simply tape a sheet of parchment paper to a window where sunlight is shining through. The resulting light will soften considerably, reducing the shadows and glare on your food subject.

Another way to utilize parchment paper is as a photography background or surface. Try plain parchment paper for a white surface, or the brown version for a different color option.
Gift wrap

Since we’re on the subject of photography surfaces, gift wrap is another affordable option for shooting food against creative backdrops. Cutting boards, tabletops, and placemats are also popular options, but they can be pricey and take up lots of room to store. Gift wrap, on the other hand, is plentiful with a variety of colors and textures to choose from.